

Prosthetics on implants begins after the implants have stayed in the bone for between 4 and 6 months without functional loading. Next come uncovering of the implant (with closed implantation), an impression, a temporary crown for about 2 months and finally a permanent crown on a suitable abutment. Below are the steps and the types of crowns and abutments.
When can implants be restored with prosthetics?
As explained in the section on osseointegration, implants need between 4 and 6 months in the bone without functional loading, so that the bone can bond with them and they become ready for prosthetics.
Ideally, implants in the lower jaw can be loaded in the 4th month and those in the upper jaw in the 6th.
How does prosthetics on implants proceed?
Step 1: Uncovering the implant
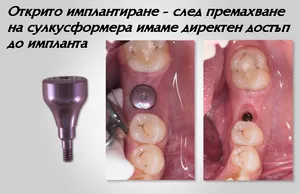
If, when placing the implants, a gum-level implant or a bone-level implant was placed but, instead of the standard closed implantation, a healing abutment was placed straight away (open implantation), there is direct access to the implant and an impression for the temporary crown can be taken immediately.
With closed implantation, the next procedure before prosthetics is the so-called uncovering of the implant.
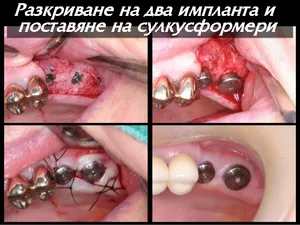
It is a microsurgical procedure that consists of opening the gum over the implant that was placed. With the gum opened, the level of the bone around the implant is inspected and a visual check of osseointegration is made. If an area is found where the implant has not osseointegrated, this is a very favourable moment to add bone graft material and restore the level of the bone.
After that the cover screw of the implant is removed and a healing abutment (gingiva former) is placed in its place – a special smooth abutment around which the gum is sutured tightly and left for about a week to 10 days to heal. When the gum has healed enough, the impression for a temporary structure is taken.
Step 2: Impression of the implant
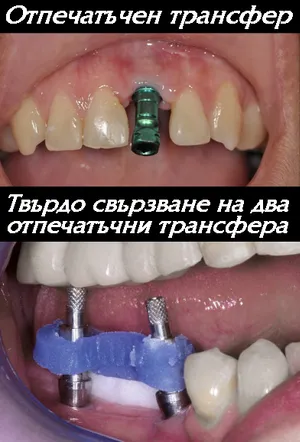
The impressions from which crowns on implants are made are extremely complex to take. Many additional parts are needed, which sometimes exceed the price of the implant itself.
The healing abutment is removed and the so-called impression transfer is placed in its place – a special titanium component that is held to the implant with a long screw. Its role is to stay in the impression after it is taken and so fix the exact position of the implant in the patient’s mouth.
When an impression is taken of more than one implant, the individual impression transfers must be connected to one another with ligature wire and rigid fixation so that no deviation of the impression components relative to one another is possible. The silicones for such impressions are special – they must reach high strength once set while at the same time being extremely precise.
Recently, computer scanning of implants with CAD/CAM systems and digital fabrication of crowns have also been making serious inroads. After the impression is taken, the healing abutment is placed on the implant again.
Step 3: Implant analogue and model
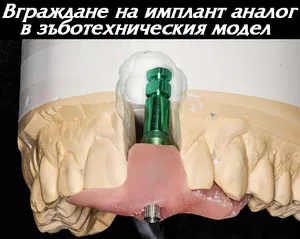
The so-called implant analogue is placed on the impression transfer in the impression – a laboratory copy of the implant that is incorporated into the plaster model of the jaw and reproduces the exact position of the implant in the mouth. From here the dental technician is ready to start making the temporary crown. For it a temporary abutment is needed, which is placed on the implant analogue in the plaster model.
When making plaster models for implant crowns, the gum around the implants must also be recreated.
Step 4: Temporary crown
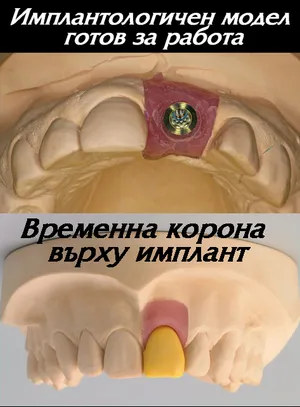
The gum is recreated by placing a special pink silicone around the implant analogues, imitating the colour and elasticity of the gum. On the model created in this way the dental technician can make the perfect temporary crown.
Once the temporary crown is ready, the healing abutment is removed and the temporary abutment is placed in its place. It is tightened to an exactly defined value with a torque ratchet, after which the temporary crown is cemented onto the abutment.
Patients keep temporary crowns for about 2 months. That is the time needed for the gum to heal fully and adapt around the crown, so that the most favourable emergence profile possible is created, which will protect the implants.
Step 5: Permanent crown
The procedure for taking the impression for the permanent crown is the same as for the temporary one. The type of permanent crown depends on the permanent abutment used – see below.
Why is a temporary crown made?
Making a temporary crown on the implant is a key factor for the success of implant treatment. It provides a gentler loading of the implant and its gradual inclusion in chewing.
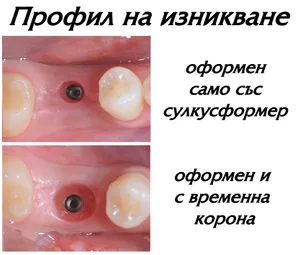
The other extremely important feature of temporary crowns is that they are used to shape the gum – the so-called emergence profile. The health of the gum is of key importance for the life of the implants. For the gum to be healthy, it must fit tightly against the implant crown, but at the same time it must be possible to clean everywhere around the implant with interdental brushes and an oral irrigator.
After a temporary crown is placed, the patient is monitored over time and it is followed how their gum reacts to the new crown. If necessary, material can easily be added to and removed from it, so that the shape of the gum and crown that is most favourable for cleaning is achieved.
What types of permanent crowns on implants are there?
Permanent implant crowns placed in the mouth look the same, but there are several types depending on the permanent abutment used.
Standard straight abutment
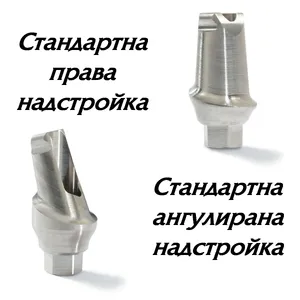
Used for implants in a favourable position and allows crowns to be made that are cemented directly onto it. It can be either with or without a shoulder.
With these abutments it is possible to leave a hole in the crown and cement it outside the mouth – this makes a screw-retained crown on a standard abutment, but it is applicable only when the placed implant has a perfect prosthetic position.
Standard angled abutment
Used for implants in an unfavourable position within 15 to 30 degrees. It corrects the position of the implant and allows a standard cemented crown to be made.
Multi-unit (two-part) abutment
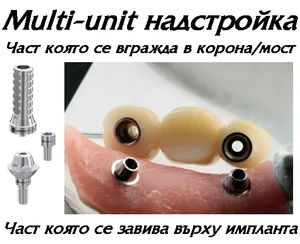
A specific type of abutment consisting of two separate abutments: one is screwed onto the implant and the other is built into the crown. It allows screw-retained crowns to be made on the implants.
These abutments are extremely precise and allow the crowns to be removed easily at regular intervals for cleaning. They are also used to change the direction of implants when there is more than one implant and they differ in parallelism. This makes them extremely widely used in structures with 6 or 8 implants. They can be angled at 15 and 30 degrees.
Custom abutments
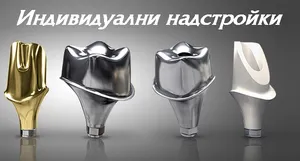
Used when the position of the implant is unfavourable or when none of the standard types of abutment is suitable for the case. They are made by the dental technician or by special milling centres at the head office of the implant manufacturer. They can also be zirconia, when a high level of aesthetics is needed in the area of the front teeth.
Ti-Base abutments
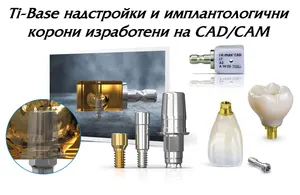
Special CAD/CAM abutments used to make metal-free permanent crowns entirely digitally on a computer. They make it possible to produce the permanent crown within 3 – 4 hours from lithium disilicate ceramic (IPS e.max), which saves the patient nearly a week of waiting.
How much does prosthetics cost?
The type of abutment is chosen by the treating dentist according to the specific clinical case, and so the price of the prosthetics can sometimes vary. Prices are in the price list.
What are the advantages and disadvantages of screw-retained crowns?
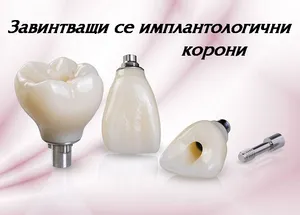
Screw-retained crowns on implants have many advantages over cemented ones:
- They can be removed easily at the dental clinic so that the condition of the gum and the implant can be inspected and everything thoroughly cleaned. With cemented crowns this is impossible.
- If the screw connecting the implant and the crown becomes loose, with a cemented crown this leads to the loss of the old crown. With screw-retained crowns the screw is simply tightened and the crown continues to function.
- There is no cement, because the abutment is built into the structure itself. This avoids the possibility of cement being left in the gum around the implant after cementation, which would inevitably lead to problems with the implant.
- It is possible to restore several implants with different parallelism, which is a problem with standard abutments.
- They are placed easily and quickly – literally just unscrewed from the model and screwed in the mouth, after which they are adjusted to the bite.
Their only drawback is the higher price, because they are two-part, but their advantages over standard abutments for cementing are considerable.
Frequently asked questions
When are implants restored with prosthetics?
After 4 to 6 months in the bone without functional loading. Ideally, implants in the lower jaw can be loaded in the 4th month and those in the upper jaw in the 6th.
What is uncovering of the implant?
A microsurgical procedure with closed implantation – opening the gum over the implant to check the level of the bone and osseointegration. The cover screw is replaced with a healing abutment, around which the gum heals for about a week to 10 days.
How long is a temporary crown worn?
About 2 months – the time needed for the gum to heal fully and adapt around the crown, so that the most favourable emergence profile is created.
What types of permanent abutments are there?
Standard straight, standard angled, multi-unit (two-part), custom and Ti-Base abutments. The choice is made by the treating dentist according to the specific clinical case.
What is the advantage of screw-retained crowns?
They can be removed easily at the clinic for inspection and thorough cleaning, if the screw loosens it is simply tightened, no cement is left in the gum, and their only drawback is the higher price.